Monday, December 30, 2013

That's a LOT of Fish!


We're making an undersea scene
 that you
can tweak to use what 
materials are easier for your child. 

For older preschoolers, you can use foam fish that you
put IN the bag of water.
For younger hands, you can substitute 
fish stickers and stick them to the outside of the bag.

You will need a sandwich-size ziplock baggie,
some blue food coloring, 
and some foam fish.


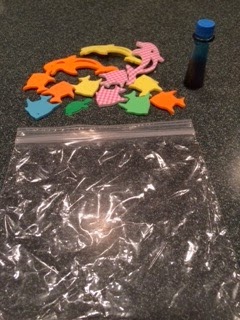
You only need a little water in the bag.


AND, you only need 1 drop of blue food coloring
since there isn't much water.


Then, let your child add in the fish.  
And there should be a lot, 
because Peter caught a lot of fish
when Jesus told him to go fishing!


Once the fish are in, carefully press out 
all the excess air so the bag lies flat.
If your child is younger, you can 
put tape over the seam to prevent
accidents.  

When the bag is flat on a table, you can
let the fish "swim" around, while you
talk about how many fish 
Peter caught when Jesus helped him.
Jesus can do anything!

Tuesday, December 24, 2013

The Brightest Star!


The Wise Men followed a bright star to find the child King. 
 Your child can make his own 
bright star to remind him of those early travelers. 


This is a super, NOT-messy craft!
Though you can adapt it to be messy, 
if you like.

As is, you need a sheet of laminating paper,
colored tissues paper, scissors, hole punch
and some yarn to hang your star.

For a messy version, you can 
glue the tissue paper to
card stock.  Your choice.  


Help your child mark off a
Star shape on the laminating sheet
and cut it out for them.


Tear pieces of tissue paper to 
brighten your star.


Peel the protective cover off the laminating 
sheet and lie it sticky side up on the table.
Let your child arrange the tissue scraps
in whatever arrangement they like
to cover the sticky surface.


Use a hole punch to make a
hole to thread a piece of 
yarn to hang your star.


Hang your star where you and your 
child can see it and talk
about what it would be like
to follow a star to find the One 
who was born to be King!


Tuesday, December 10, 2013

Cupcake Angels!


The angel brought great news to some shepherds;               Jesus is Born!
You can make your own angels
to share the Good News, too!


You need a cupcake liner, regular or jumbo size will work.
And a paper doily for wings,
card stock for the face
and a halo; a pipe cleaner, or glitter, if you're brave! 
This craft is posted by several sites online,
and there are endless variations! 
Use what you have and experiment!


Flatten the cupcake liner then fold it in half.


Fold it in half again, using a dot of glue  
near the top of the middle to help hold it


Cut a circle for the head
and two wings from the doily.


Let your child draw a happy face
(this angel is very happy!)
And wrap a small piece of the 
pipe cleaner for a halo.
You can glue anything shiny or even
glitter, if you dare, for the halo.


Glue the wings to the back
and the head to the front! 
Now your angel is ready to share
the good news:
Jesus is Born!


Tuesday, December 3, 2013

A Manger Scene


When Baby Jesus was born there was no room for Him,
 in an inn, so Mary's baby boy had to sleep in a manger.  
This is an easy craft for your child to make 
his own manger scene.


You'll need a piece of cardstock for a background,
craft sticks, popsicle sticks or coffee stirrers,
a pompom, wiggly eyes, a felt blanket
and some tacky glue.

This is a great craft for kids that love glue.
You have to use lots and that's just fun!


Make a nice blob of glue and cross your
craft stick to make a manger.


Cut strips of the brown paper for 
hay. 


Show you child how to fold the strips
like this:


Time for more glue!
It takes a decent amount to catch
all the "hay" to stick.


Glue the wiggly eyes to the pompom
and glue a felt square, or paper, 
for a blanket.


Then let it dry!!! 
Enjoy the Christmas story with your child!

Tuesday, November 26, 2013

A Christmas Message

The angel brought a special message to Mary;                God was  giving her a baby!                                            Jesus was going to be born!

Your child can decorate an envelope to bring special messages 
this holiday season.
You need a business-size envelope
crayons, markers, stickers or stamps.
index cards, hole punch, ribbon
and scissors.


First, mark off 2 3/8 inch from each corner of the flap


The pointed flaps are even better,
but I had this kind, and they work, too.


Let your child decorate the envelope using
whatever you prefer, markers,
crayons, stickers, anything will do!


Fold the edges of the envelope to the middle.
Decorate those flaps, too!


Punch a half-hole on each side,
about half-way down the length of
the flap.


Thread a long piece of ribbon through the holes,
inside your flaps.


Cut the index cards in half.
Let your child decorate a message:
Baby Jesus is going to be born,
A heart for I love you,
Or whatever they want to share with
someone as a special message.


Slide the "message" inside the envelope
and fold and tie.


Now your child can deliver special
messages to those he loves
just like the angel brought 
Mary a special message too!


Tuesday, November 12, 2013

The Thankful Tree


Fall brings a great opportunity to
use the abundance of leaves
to talk with your child about God!
This activity let's you use leaves to
remind you of all the places you can 
go where God is with you,
Everywhere!


You only need construction paper,
scissors, markers and glue.


Let your child draw a tree trunk & branches


Cut out a lot of leaves; use whatever
is your child's favorite color!


As you go through your week,
write the places that you go
on a leaf.


Leave the "pile" of leaves sitting
at the bottom of the tree.
You can put the back on the tree
as you go!  


Your tree will be "growing"
leaves, as the ones around you 
will be losing theirs! 
Talk with your child about how MANY 
leaves there are, 
and how MANY places we go.
And God is with us in all of them!


Tuesday, November 5, 2013

God is Always With Me Book


Your preschooler can make a book         
that will remind him that
everywhere he goes,
God is always with him! 


His book can have as many pages as you 
would like to make.
Each page represents a place where he goes often.
You can decorate each page in a variety of ways,
your child can draw a picture of the place,
or you can use stickers,
or pictures from a newspaper or magazine.

Construction paper for the pages and 
white paper for each picture,
double-sided tape or a glue stick,
scissors, hole punch, and yarn to hold it all!


Cut the construction paper in half, lengthwise,
then fold those pieces in half to make your book.
Orange and brown make a fun fall book.
You can use as many pages as you want to make.


Punch two holes on the left side,
through all thicknesses,
for threading the yarn to bind it.


You can title the  book for your child!


Cut white paper rectangles for each
page.  You can use glue stick 
or double stick tape to fasten 
them to the construction paper.


If you are using stickers or pictures 
from magazines or newspapers, 
put one picture on each page
to represent a place where your child goes.


Or your child can color the places 
he goes.


Thread two pieces of yarn through 
the holes and tie to make a binding.

Now you can look at his book
and talk about the places he 
went today.
And remind him that 
God is always with him,
 every place he went!